Hobby boat special: How to route battery cables, gear cables and steering cables
Erich Bogadtke
· 17.10.2023


In this special:
- Pegazus 450 - assemble a boat yourself
- How to position the control stand
- How to install the handrail and railing
- Installing the swim ladder, anchor roller and stowage boxes
- How to route battery cables, shift cables and steering cables
- Install the motor correctly
- This is how the assembled Pegazus 450 rides
The time has come, it's time for technology. This means that the BOOTE mechanics install everything that the 50 hp outboard motor we purchased needs. This includes a starter battery, engine instruments, single-lever throttle and gearbox controls and a wheel steering system. Logically, who wants to start an engine in this power class by hand and steer it with the tiller? Not us! We are happy to leave this feat to the "real artists". We start the working day with the power supply. In plain language: The battery box is placed on the starboard side in the storage compartment in front of the steering position on the stud bolts pre-assembled by the boat manufacturer and screwed on with sealant and large washers. Cap nuts and a thick polystyrene insert ensure that there are no "impact injuries" to the battery, even in rough water. Important: Before screwing down, lay the tensioning strap for the cover under the box.
Lay cables correctly
The supplied battery cables can then be pulled towards the helm and engine compartment. This is one of the easiest exercises if, as with our Pegazus, the shipyard has already laid empty conduits in the hull during production. Once everything is in place, the cable bushings in the deck mould can be inserted with sealant and screwed in place. Finally, the electrician attaches the negative cable (black) to the "earth rail" in the steering position and the red positive cable to the main battery switch. Both cables are held securely in the front of the storage compartment with plastic cable ties. Nothing rattles!
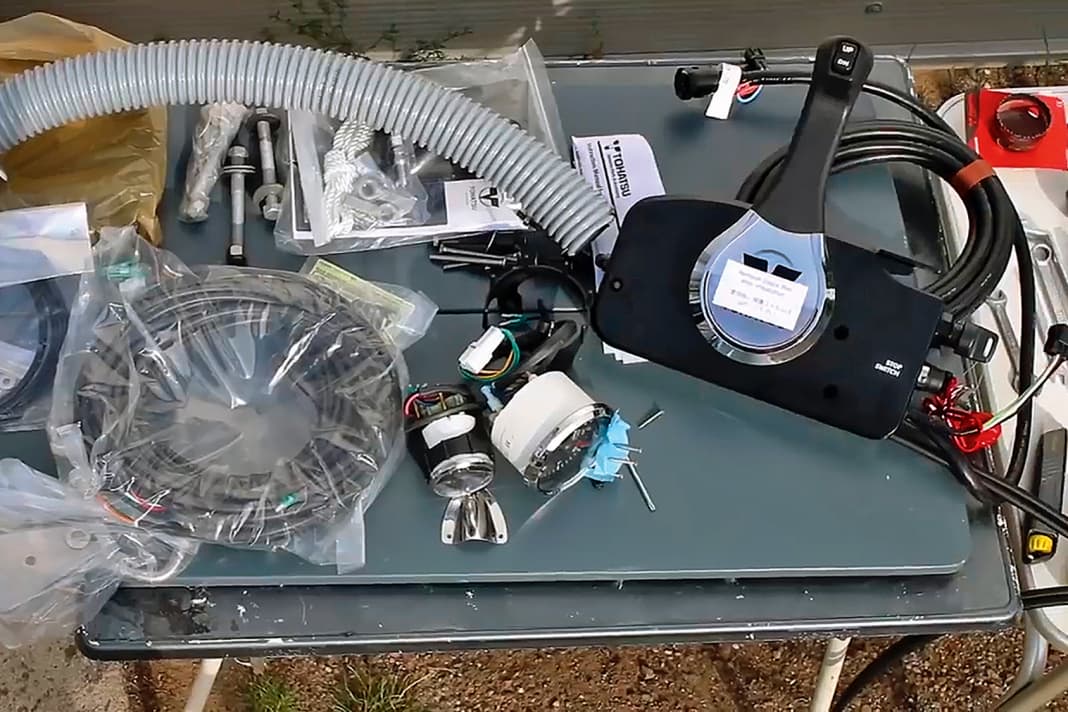
The boat seller has done the groundwork for the single-lever gearstick for the throttle and gearbox (included with the engine) and pre-installed the Bowden cables (eight feet long) that match the engine and boat in the gearbox. When choosing a position for the side-mounted switch box, the mechanic must ensure that there is sufficient freedom of movement for the driver's hands when steering, shifting gears and accelerating in any situation - even at full ahead and back and in roundabouts.
Once the best place has been found, mark and drill the 6.5 mm holes for the three stainless steel fastening screws on the console through which all cables are routed. Now insert the screws through the switch box and the supplied spacer sleeves between the box and the console and screw the circuit with large washers and self-locking nuts. This will last forever and three days. A tip: Short strips of adhesive tape prevent the screws from slipping out at the front during assembly.
Rule for laying the shift cables
When routing the shift cables, the rule "the larger the curve radius, the easier the shifting process" applies. For this reason, a hole saw is used to cut a passage in the cable bracket, which is later covered by a polished cap. Works great and looks really good too. The same applies to the spiral hose, through which the cables and Bowden cables are routed invisibly towards the engine sump.
When choosing a position for the rev counter and trim indicator, the focus is on a clear view of the instruments. Once the position has been found, it is necessary to check in the control position whether "the track" is clear. A sawn wiring harness would be a disaster. It is clear that the two round instruments should be in line with each other. Before the large (100 mm and 52 mm) hole saws are put into action, absolute care must be taken when measuring and marking. Important: When sawing, the drill should be in "steady hands".
Inserting the instruments
Once the snow (sawdust) has been cleared, the instruments are inserted, aligned and screwed in place from behind. This is sometimes a little fiddly, but nothing that will upset experienced mechanics. Teamwork is required when installing the steering cable. This means that while one person turns the shaft of the steering gear, the "second man" in the steering position inserts the cable end into the gearbox input. If everything is correct, the spiral end of the cable disappears completely into the gearbox and the fitter can insert and screw the abutment for the steering cable to the gearbox housing.
The only thing missing is the stylish sports steering wheel. An adapter with a thick nut is screwed onto the gearbox shaft so that it can be brought into the perfect straight-ahead position. The "intermediate piece" allows the steering wheel to be mounted in six different positions using the appropriate Allen screws. The helmsman has to find out which is the right one during the first test drive. The steering wheel can be "repositioned" when turning the corner in the straight-ahead position.
Laying the cables
Lighting and upholstery assembly
This article is part of the craft boat special. All contents:
- Pegazus 450 - assemble a boat yourself
- How to position the control stand
- How to install the handrail and railing
- Installing the swim ladder, anchor roller and stowage boxes
- How to route battery cables, shift cables and steering cables
- Install the motor correctly
- This is how the assembled Pegazus 450 rides

