

In this special:
- Pegazus 450 - assemble a boat yourself
- How to position the control stand
- How to install the handrail and railing
- Installing the swim ladder, anchor roller and stowage boxes
- How to route battery cables, shift cables and steering cables
- Install the motor correctly
- This is how the assembled Pegazus 450 rides
We want to have a bit of fun and therefore opt for the larger of the engine variants offered by Bauhaus, namely Tohatsu's 50 hp MFS50 AETL with electric start and power trim. If you want to do as we do and go 30 knots fast with the Pegazus, you will pay 7499 euros for the "fun maker" in the long-shaft version at Bauhaus Nautic (as of October 2023). For your information: The licence-free alternative, the 15 hp MFS 15 EEPL from the same engine manufacturer, is available from Bauhaus for 3099 euros.
When installing the motor, the motto is "Read and measure first, then drill". The correct mounting height is important. As a rule of thumb, the anti-cavitation plate of the outboard motor (the flat part of the housing above the propeller) should be one to two cm below the lowest point of the boat floor. If you want to go higher, you may be a little faster, but you risk ventilation. In other words, the propeller draws air when cornering and accelerating.
Adopt dimension from instructions
The measurement between the anti-cavitation plate and the top hole of the bracket (motor mount) measured on the motor using a folding rule is transferred to the mirror. Then mark the width, i.e. the measurement between the two holes of the bracket on the mirror as specified in the motor manufacturer's installation instructions. A centre line drawn on the mirror beforehand makes the work easier in any case. The exact position of the lower holes is also specified in the (assembly) plan. The fitter only needs to transfer them to the boat using a folding rule and felt-tip pen. No big deal!
To ensure that everything runs smoothly, we need to drill four 13 mm holes in two stages (pre-drill with 6.5 mm) for the fastening bolts supplied. It is important that the holes are drilled at right angles to the boat transom.
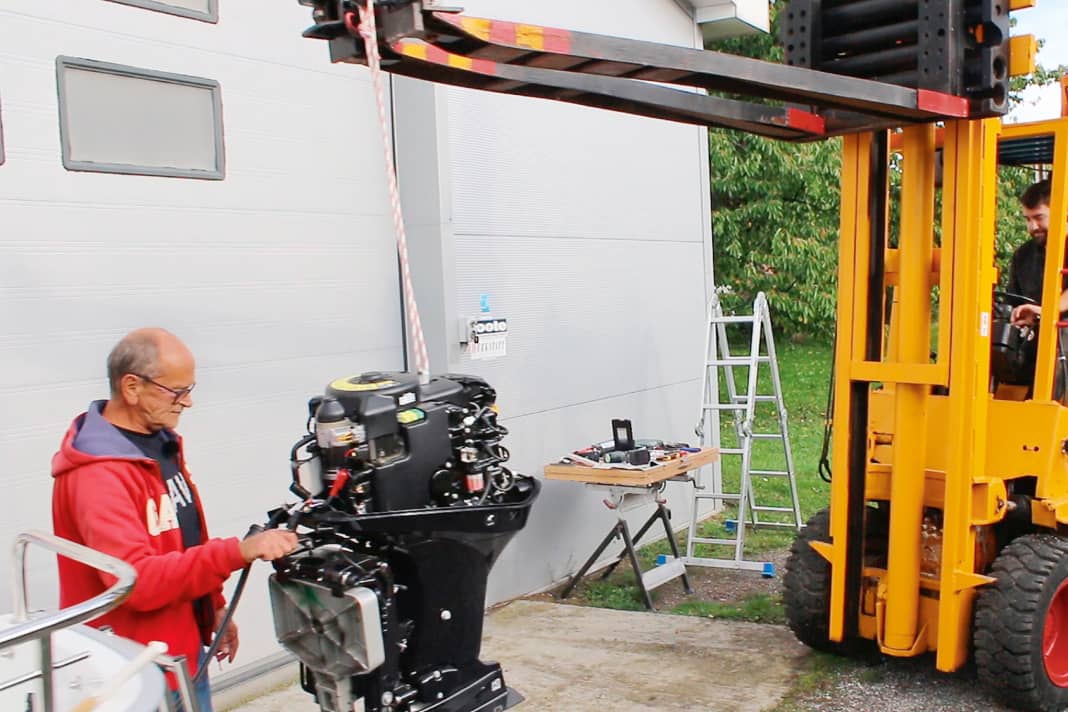
A tip: A stop bracket shows you where to go. Before the motor, which is attached to the forks of the forklift truck, reaches the mirror, the steering cable must be inserted into the bracket and screwed on with the large (27 mm spanner width) union nut.
Are all bolts in place?
The motor can now be positioned and the fastening bolts inserted with sealing compound. Once all the bolts are in place, the nuts are first hand-tightened. For the screwdriver finish, we need a torque spanner with a 17 mm socket. The installation instructions provide information on the correct torque. To ensure that nothing shakes loose, it is important to use the self-locking nuts supplied when fitting the bell crank. The next steps are to insert the starter battery, screw the battery cables to the terminals, fit the cover and tighten the tensioning strap.
Once the power supply has been established, the transmitter for the trim indicator is fitted, the cable is routed forwards to the indicator and connected, and finally the function of the power trim and indicator is checked. Before the warranty certificate is issued, all Tohatsu engines with 15 hp or more must be commissioned by an authorised specialist workshop.
The engine specialists from Marx in Hamburg check that all screw connections are tight, connect the Bowden cables of the single-lever gearstick and adjust the throttle and gearstick. The cable routing and the cable connections on the engine and the instruments are scrutinised. If the electrics are OK, the specified quantity of engine oil is topped up to the prescribed viscosity and quality.
Test run
The computer can now be connected to the motor's control unit and the motor placed in the test tank. During the test run, all parameters are read off the laptop, the functions of the single-lever gearstick are checked and their settings are corrected if necessary. If everything is correct, the oil level in the engine and gearbox is checked again and optimised if necessary. Finally, the engine is registered. This is the only way the customer can be sure that there is no problem with the five-year warranty.
Conclusion
If you can't or don't want to do it yourself, you can buy the ready-to-ride Pegazus 450 from Bauhaus in the Ready to go version for around 14,000 euros. We spent exactly the same amount of money, except that we also have useful accessories such as a trailer, aft boxes, a sunbed package, a bathing ladder, bow and stern rails with cleats, an anchor roller and certified navigation lighting. The fun of screwing, writing and filming was and is priceless for us anyway. You can read in the following article whether and how our Pegazus has proven itself in the tough conditions of the BOOTE test crew.
Mounting the outboard motor
Putting the motor into operation
Visit to the specialised workshop
This article is part of the craft boat special. All contents:
- Pegazus 450 - assemble a boat yourself
- How to position the control stand
- How to install the handrail and railing
- Installing the swim ladder, anchor roller and stowage boxes
- How to route battery cables, shift cables and steering cables
- Install the motor correctly
- This is how the assembled Pegazus 450 rides

