Port manoeuvres: What you should bear in mind when mooring and casting off
Christian Tiedt
· 09.05.2021

Cast line


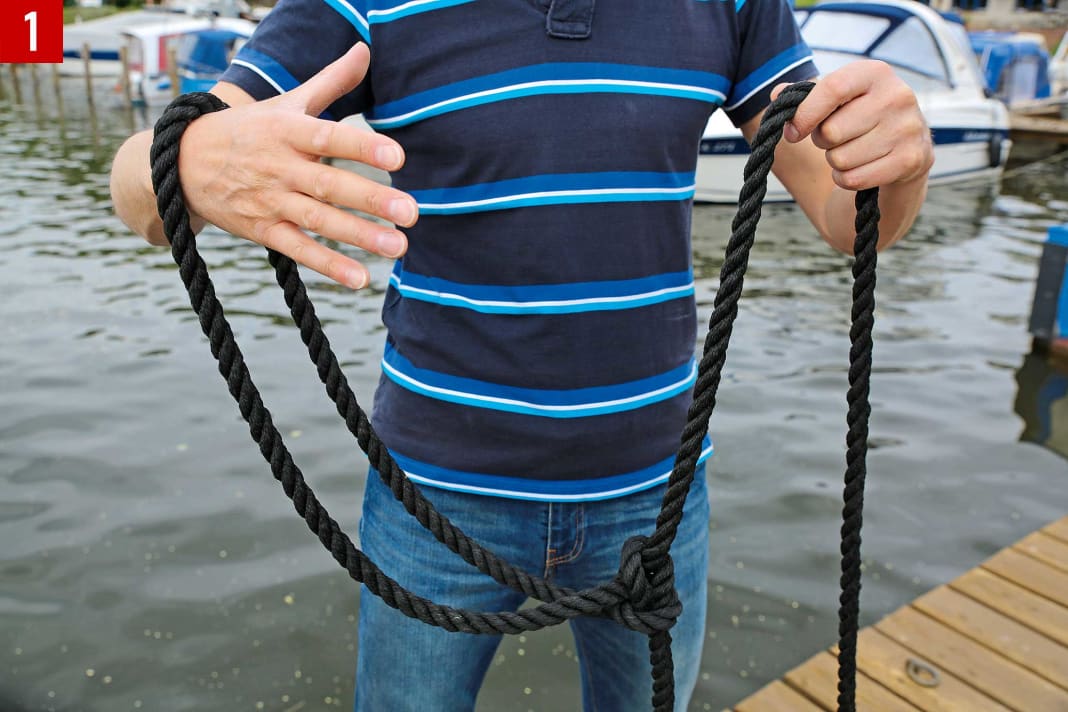
In general, the following applies when throwing a line: the recipient will be pleased if he is not hit by a heavy bundle, but only receives one or two bays after a targeted throw. However, he is even happier to receive the line directly from the hand. Sometimes, however, the cast cannot be avoided. That's why a long manoeuvring line that you can also throw is part of the preparation for every harbour manoeuvre. Here's how: 1 Shoot the line neatly into bays in one hand. 2 Then take two to three bays in your casting hand, depending on the thickness of the line and your own strength. Drop one bight to take a swing. 3 Now fling the remaining bays over to the target, 4 quickly opening the hand with the shot-up waistband in the direction of the throw, 5 so that as much line as necessary can run off by itself.
Cover cleat


Round turn, figure of eight, head bang: everyone on board should memorise these three words like a mantra. Because every crew member can be embarrassed when manoeuvring in the harbour and get a mooring line in their hand. As cleats are available on most boats and on many pontoons, you should also know how to use them. Cleats achieve their effect through friction. By hitting figure eights, the distance over which friction acts is extended. It is also increased by the sharp deflection at the horns. Here's how: 1 Lay the mooring line 180 degrees around the cleat. This usually provides sufficient friction. The fixed part must lead away from the cleat. Otherwise it can pinch the loose part (as shown here, the line is also guided when it has to be fished). 2 After the first round turn, the loose part is then laid around the horns in figure eights until there is no longer any tension on the loose part 3, otherwise the final head lay could pinch. This is only intended to secure the figure eights. 4 The head stroke must be executed in a criss-cross pattern. At the end, all figure eights lie parallel on top of each other
If the mooring line is set to slip, which is practical later when casting off, one eye is taken on board (either on a cleat or a bollard A ). The loose part leads from there under the railing ashore and then back on board B . However, if the line is properly tied ashore, the same applies as on board: only as much as necessary. In the picture above, far too many round trips and figure eights have been made on the cleat C . If you already have an eye in the line, pull it through the cleat and then lay it over it D .
Running eye


You can tie up to a pole by simply placing an eye over it or the mooring line around it on a slip. However, if the pole has no hook, the line can easily slip downwards. Dirty harbour water is the lesser of two evils; with heavy mussel growth, the mooring line can even become so snagged that it has to be cut. The variant shown here with a running eye helps against this. It is also suitable if it suddenly becomes apparent when mooring that the actual eye is too narrow or it could slip upwards off the pole as the water level rises. However, this method also has a serious disadvantage: boats arriving later can only lay their mooring lines over their own line, making it difficult to access or blocking it. The running eye should therefore only be used for long-term mooring at your own berth or otherwise in consultation with your neighbours.
Poke eye through

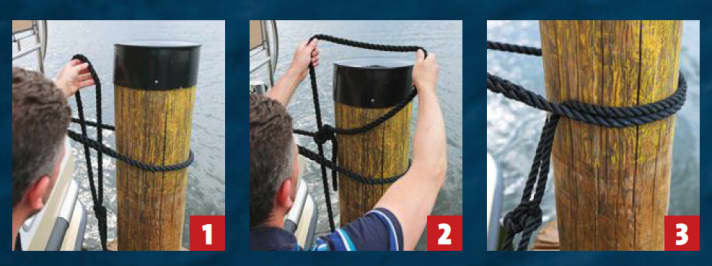
If a pole is already covered with other lines, the eye of your own mooring line should not simply be placed over it. Otherwise the neighbour would either have to open his own bowline or - if the eye is spliced in - even remove both lines. 1 Therefore, your own eye should instead be passed through the other eye from below 2 as shown and only then placed over the pole 3 . In this way, the other line can still be released first.
Extension
Boat hooks are suitable as an extension of the arm: hang the eye of the mooring line on the hook and open it by pulling on the loose end. It can now be placed over the pole. Be careful with telescopic extensions: When extended, they are lighter and reach further, but are no longer as stable as fixed models.
Well prepared for the mooring manoeuvre

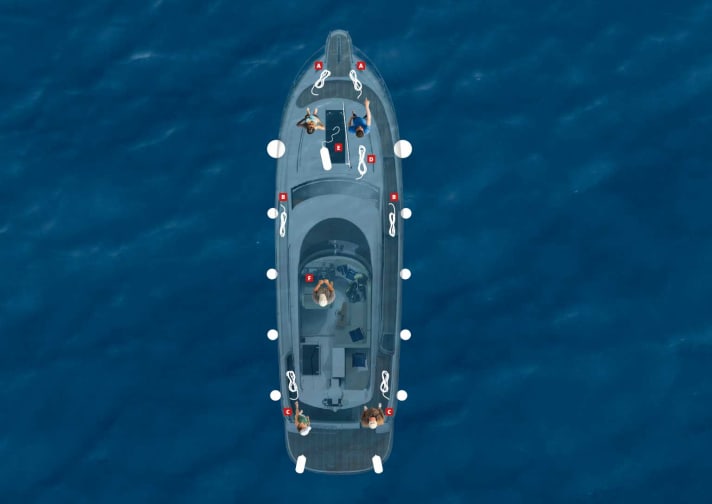
The larger the crew, the better for the mooring manoeuvre. This is because it is easiest, at least for larger boats, if two people can be assigned to each of the lines on the fore and aft deck, as shown here. To avoid any confusion, however, the crew must be well-rehearsed or at least be instructed in the respective tasks. One person on the foredeck is also responsible for indicating the distance to the jetty. In addition, the following equipment should always be prepared and ready for use on deck or already deployed: 1 FENDER Depending on the length of the boat, at least three normal fenders and one ball fender should be deployed on each side of the boat, as long as it is not clear which side will be used for mooring. They are attached to the railing with weaving ropes and should not touch the water. The height depends on the berth. You may also need stern fenders. 2 LINES It is important for all lines that they are first led from the cleat on board under the railing to the outside and only then around the top back to the deck, where they are laid out in bays. In any case, two fore lines are prepared on the corresponding cleats A and two aft lines C . Lines can also be stowed amidships B . If required, they can be used either as a temporary short centre line or as a spring at any point. If available, another long reserve line can be added at an easily accessible location D in case another line breaks, goes overboard or has to be left behind. 3 MISCELLANEOUS In addition, another fender for holding off and the boat hook should be ready to hand in order to be able to think about lines E . At helm position F, the skipper ensures a clear all-round view, switches off the outside music to enable good communication and switches on the bow and stern thrusters if the boat is equipped with them.

